Weekly feed tips for your garden
Today Ive got a few tips on applying weekly feed fertilizer to your garden that will help improve your gardening experience. These tips on applying weekly feed to your garden will make things easier for you and help to make your plants healthier. Check out these tips for applying weekly feed to your garden and let us know if it helps you. Have any of your own tips? Share them in the comments,
Make sure your fertilizer is mixed before you go to the garden
Each week before I go to the garden I make sure the nutrients in the weekly feed are mixed well. With the lid on my bucket securely, it gets tipped end over end a few times. This redistributes the smaller micro nutrients and Epsom salt through the fertilizer. If you don’t do this, the micros and Epsom salt will settle to the bottom of the bucket and won’t get to your garden in the necessary amounts.
Applying weekly feed to garlic and onions
For most crops, the weekly feed is applied down the middle of the growing area. With onions and garlic you do not have that open space in the middle. (See spacing in this topic.) With garlic and onions just scatter the fertilizer over the entire growing area and water it in well. We don’t notice any type of fertilizer burn from it coming in contact with the plant. If you are worried about fertilizer burn simply water with your hose and a watering wand.

Water weekly feed into grow boxes by hand
Weekly feed that is applied to grow boxes must be watered in on day one with a watering wand. The automated watering is insufficient to thoroughly wet and get the nutrients into the growing medium. You can resume using your automated watering, if you use it, until your next feeding day. If you use only your automated watering system not all the nutrients will dissolve and be available to the plants. This can lead to hidden hunger and nutrient deficiencies.
Soil beds can be watered normally
Weekly feed applied to soil beds can be watered in with the automated system. Because the bed is watered until there is standing water the nutrients are able to dissolve. You do not need to water the weekly feed in by hand like you do with a grow box.
Prune in advance of applying weekly feed
Prune a day or two before feeding this. This opens up the grow box/soil beds and gives you more room to apply the weekly feed. You can see the kale in the video and the picture below as an example. As the garden grows and the plants get bigger it becomes difficult to apply weekly feed without getting some on the plants. If left on the plant the weekly feed will burn the leaves. Simply rinse the leaves off with your watering wand. For garlic and onions, just shake the weekly feed over the plants and the entire growing area and water. For crops that are grown in two rows and get too big for you to easily apply weekly feed down the center of the rows, you will need to gently pull one side back far enough to apply the weekly feed. It can be a bit of a challenge, but you’ll get the hang of it pretty fast.

Rinse weekly feed off plants to prevent fertilizer burn
Once your crops get big it becomes a challenge to apply weekly feed without getting some fertilizer on the leaves. The above picture shows big plants that make this a challenge. If left on those leaves it will “burn” the plant where the fertilizer sits. The fertilizer will leave a small white spot around it where the burn has occurred. In some instances you can simply shake the leaf slightly to remove the fertilizer. Since it needs to be watered in anyway, generally I use the hose and our watering wand. This rinses the weekly feed off the plants and waters everything.
Better seed germination in clay soil
If you have ever grown a garden in clay soil, you know it can be challenging. I have a few tips for you that will help give you better seed germination in your clay soil. Fortunately the steps to improve your germination rate in that clay soil are easy and have little to no cost. Following these steps will greatly increase your rate of germination.

Monitor soil temperatures
To improve your seeds germination rate in your gardens clay soil it is vital that you know your soil temperature. If you soil temperature is below 60 degrees Fahrenheit you will see little to no germination from your seeds. The optimum temperature range to increase the chance of germination is 75 to 80 degrees Fahrenheit. Planting your seeds at the ideal soil temperature will greatly increase your seed germination rate.
Ignore planting depth instructions on the package
The planting depth directions on the back of your packet of seeds is not ideal for those of us who have clay soil. Plant your seeds to a depth 2.5 times the thickness of your seed. The seed has enough nutrients in it to get that new seedling above the soil. If the seed is too deep it will run out of energy before breaking through the soil. Having to push through heavy clay soil can also stop that seed from ever sprouting. We will discuss that next.
Cover your seeds with sand
If you want to increase the chance of a seed to germinate in clay soil, cover it with sand. It is far easier for that seedling to push up through sand than your clay soil. Ideally you will want to use a concrete sand which has been washed. Washed concrete sand will have far less weed seed as compared to river sand.
Cover with burlap or shelf liner
Once your seeds are planted and cover with sand, cover your sand with burlap or shelf liner. This will so 2 important things. First, the covering is going to protect the seed from birds and ensure it stays covered with sand. Secondly, it acts as a diffuser to help keep the seed from becoming dislodged from rain or while watering.
Water those seeds
After you seeds are covered with sand and burlap/shelf liner be sure to gently water to make sure the seed is moist. You have to keep that seed moist if you want it to germinate. Monitor your soil daily to ensure it remains moist. Water as necessary.
An easy way to plant tiny seeds in clay soil
If you are putting tiny seeds such as carrot in your clay soil there is an easy way to do it. We cover planting tiny seeds in another blog post. Be sure to check it out.
Here is the video
For those of you who learn by seeing, here is the video. Watch it and you can see how you can get better seed germination in your clay soil. While you’re there be sure to like and subscribe. You can find us on social media from this page. Thanks!
How to plant tiny seeds easily
Trying to plant tiny seeds such as carrots can be difficult. If you have planted them before, you know how difficult it can be to get the spacing correct. The process is often wasteful and more than a little frustrating. Let me help make this process so much easier.
How is it made easier?
The process is made easier by helping to control how many seeds are applied in the garden. It is a simple and inexpensive method where you will add a small measured amount of the seeds to a larger measured amount of sand. Once the seeds are well distributed within the sand you can easily plant those tiny seeds my shaking out the mixture.
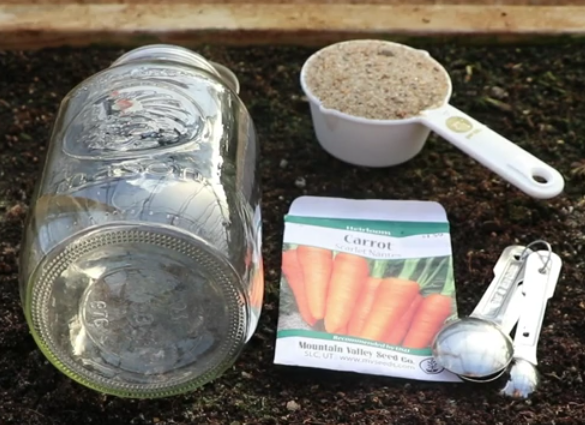
What do you need to plant tiny seeds easily
You are going to need a couple common measuring devices found in you kitchen, dry washed concrete sand, your seed and a clean container such as a common pint sized mason jar. You are about to be able to plant your tiny seeds easily!

The mixing ratio
The mixing ratio is simple. One part seeds go into 100 parts of sand. To make it a little easier for you, 1/4 of a teaspoon of seed is added to 1/2 cup of sand. Look for my video on the topic below to see the process.
Why you should use washed concrete sand
Sand from a river, or a road, is going to have a fair amount of weed seeds in it. If you use that sand you will be introducing more weeds to your garden and competition for the seeds you want to grow. Washed concrete sand has far less seeds and other foreign objects in it.
Find us on social media!